PART 6
STOCK FILTERS: THE GOOD, THE BAD

Lite-On was very thoughtful in designing this case.
#1: The primary air intake is NOT on the bottom of the bezel, subject to being blocked by carpeting and sucking up every dust bunny near the case.
#2: They actually included a filter (actually a pair of filters).

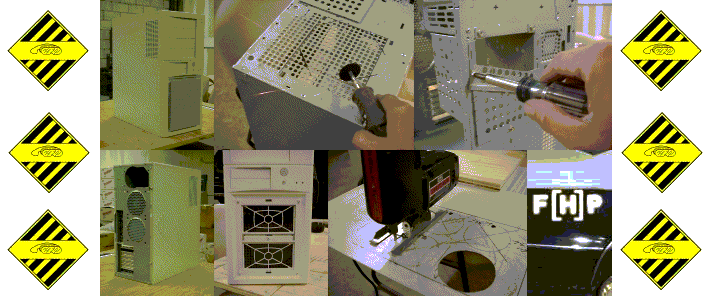
That's the end of "the good".  What can be bad about it?  The filters cannot be cleaned without removing the bezel!  That means (refer back to page 1), opening the left side panel, reaching around the lower 3.5" drive case while trying to avoid disturbing any ribbon cables, feeling around for the clip that is NOT visible with the drive cage installed unless you are looking from behind the case, pulling the clip, and popping the bezel off.  Of course, if your bezel is secured with the two screws, they must be removed first... certainly not something that should be done with the computer powered up, and difficult to do with the case on the floor under a desk... impossible if it is located in the narrow space some desks provide for the CPU.

It CAN be made better.....

All images are set to a height of roughly 240 pixels.  Click the image for the full-sized shot (800 x 600)

The main filter frame is press fit onto two small studs located on the back of the bezel in the strip you can see between the filters.  The filters drop in, and are held in place by the two frames visible on top of the filters.
 
By applying a little prying pressure to the sides, the entire filter frame pops right out.

.

The WAY COOL cover is a bit more difficult... Three hands is a big help.  There are four clips like the one that holds the bezel to the chassis, and they must be pushed away from the center of the cover.  It DOESN'T just fall out though...
...see the "legs" around the perimeter of the cover?  They are press fit over five studs on the bezel.  You can see three of those studs in the photo below.  There's one on each corner and one in the center.
Flip the main filter frame over...


...but it won't work as is.  The center cross brace covers part of the top filter, blocking removal of the inner frame.  We won't be using the clips on the outer cover, so we really don't need ALL of the support provided by that cross brace...
...so it can be trimmed to clear the filter.  Do NOT remove it completely, as the two studs on the back are still used to secure the outer filter frame.
Reinstall the frame (inside out) and glue it down.
Trim the clips off of the cover.
This is tedious.  There are a bunch of cool rivethead-like bumps on the cover.  We need to drill through the EXACT CENTER of the four on the corners.  A 5/64" drill works well for this.  Be careful, the drill will want to wander since you are drilling into the top of a dome.
Back on the chassis...
...the filters and inner frames installed...
 
...and the gray cover in place.  The cover will be screwed into place later after the case is painted.  It's not a tool-less procedure to clean the filters now, but at least it can safely be done with the computer running, and I always have a small Phillips screwdriver in the pen holder on my desk.


<<< Back HOME Page 7:  Prepping for the dual rear 120 mm exhaust fans.